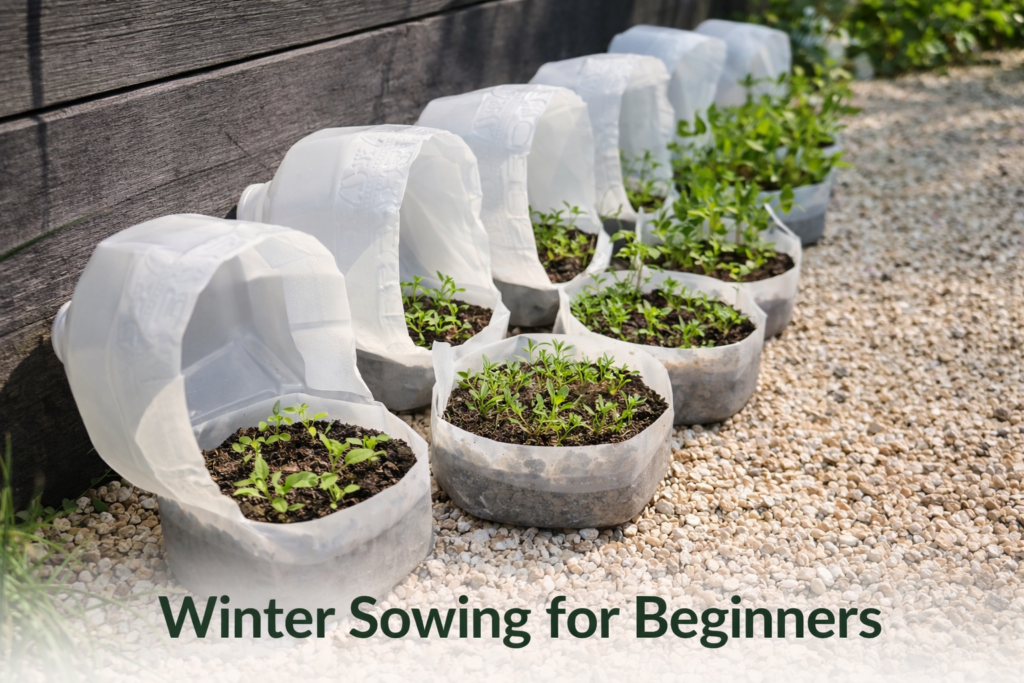
Curious about gardening but not sure where to start? Winter sowing for beginners is an easy, hands-off method that works with the seasons instead of against them. Seeds are planted in mini greenhouses during winter, where they naturally germinate and grow as the weather warms—no grow lights or complicated timing required.
By using this technique, you can give your plants a strong foundation, increase their chances of survival, and enjoy a more bountiful harvest. As a beginner, you’ll find that winter sowing is a low-cost and low-maintenance approach to gardening.
Key Takeaways
- Get a head start on the growing season with winter sowing
- Use mini greenhouses to protect your seeds
- Enjoy a more bountiful harvest with strong, healthy plants
- Low-cost and low-maintenance gardening approach
- Perfect for beginners looking to start gardening
What Is Winter Sowing and Why It's Perfect for Beginners
Gardening beginners will find winter sowing to be an attractive option as it eliminates the need for indoor seed starting equipment. Winter sowing is a method that involves sowing seeds in containers outdoors during the winter months. This technique allows seeds to germinate and grow naturally, following the chill of winter and the warmth of spring.
The Science Behind Winter Sowing
Winter sowing leverages the natural cold stratification process that some seeds require to germinate. Cold stratification is a period of cold temperatures that certain seeds need to break dormancy. By sowing seeds outdoors in winter, gardeners can mimic this natural process, allowing seeds to germinate when conditions are right.
“The beauty of winter sowing lies in its simplicity and the minimal equipment required,” says gardening expert, Jane Smith. This method works with the natural environment to produce healthy seedlings.
Benefits of Winter Sowing Over Traditional Methods
Winter sowing has several advantages over traditional indoor seed starting methods. It eliminates the need for grow lights, indoor space, and the risk of overwatering. Seeds are sown directly into containers that are left outdoors, where they are exposed to natural weather conditions.
- Reduces the need for indoor seed starting equipment
- Minimizes the risk of overwatering and root rot
- Produces hardier seedlings adapted to outdoor conditions
By adopting winter sowing, beginners can enjoy a more straightforward and less labor-intensive gardening experience. As noted by gardening author, Michael Dirr,
“The right plant in the right place is a key to a successful garden.”
Winter sowing helps ensure that seedlings are robust and ready for the garden when spring arrives.
When to Start Winter Sowing in Different Climate Zones
Timing is everything when it comes to winter sowing, especially across different climate zones. The key to successful winter sowing lies in understanding your local climate and adjusting your planting schedule accordingly.
USDA Hardiness Zones and Timing
The USDA Hardiness Zone map is a valuable tool for gardeners. It helps determine which plants will thrive in your area. For winter sowing, the zone’s last frost date is crucial. In general, start winter sowing 4-6 weeks before the last frost date in your area. For example, in Zone 5, this would typically be around late February to early March.
| USDA Hardiness Zone | Typical Last Frost Date | Recommended Winter Sowing Start |
|---|---|---|
| 3-5 | Late May | Late Dec – March |
| 6-7 | Mid April | Jan – March |
| 8 | Late March | Dec – Feb |
Weather Cues to Watch For
Besides using the USDA Hardiness Zone map, pay attention to local weather cues. Watch for consistent cold temperatures and the presence of snow cover, as these conditions are ideal for winter sowing. The freeze-thaw cycle helps to stratify seeds naturally, improving germination rates.
By combining zone information with local weather patterns, you can optimize your winter sowing schedule for the best results.
Essential Supplies for Winter Sowing Success
Embarking on your winter sowing journey requires careful preparation, starting with the right equipment and materials. To ensure your seeds have the best chance of success, you’ll need to gather a few essential supplies.
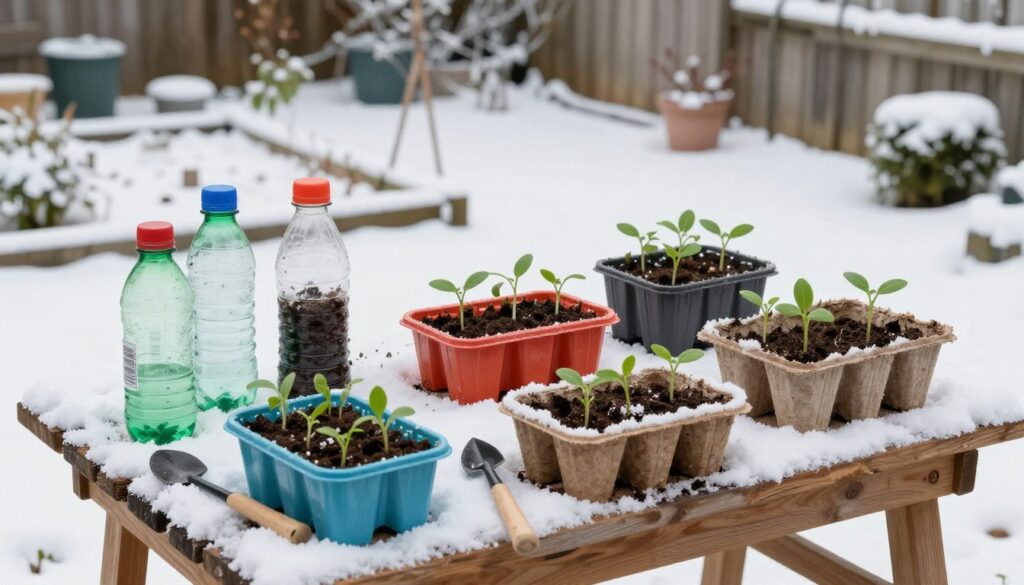
Container Options
When it comes to containers for winter sowing, you have several options. Plastic containers like milk jugs or clear plastic bottles are popular choices because they are readily available, easy to clean, and provide excellent protection for your seedlings. You can also use peat pots or cowpots, which are biodegradable and can be directly planted into the ground, reducing transplant shock.
Soil and Amendments
The right soil mix is crucial for winter sowing. A good starting mix is a seed starting mix that is sterile and fine-textured, promoting healthy germination. You can use that or a traditional potting soil mix. You may also want to add organic amendments like compost to improve soil fertility and structure. Ensure the mix is moist but not waterlogged, as this can lead to poor germination or rot.
Seeds and Labeling Materials
Choose high-quality seeds that are suitable for winter sowing. Most vegetables and flowers can be started this way, but check the seed package for specific instructions. For labeling, use waterproof markers and durable labels that can withstand outdoor conditions. This will help you keep track of what’s in each container.
By gathering these essential supplies, you’ll be well on your way to a successful winter sowing experience. Remember, the key to success lies in providing your seeds with the right conditions to germinate and grow.
Winter Sowing for Beginners: Step-by-Step Guide
Starting your winter sowing journey requires some preparation and knowledge, but don’t worry, we’ve got you covered with a straightforward guide. Winter sowing is a simple and effective method for starting seeds outdoors during the colder months. By following these steps, you’ll be well on your way to growing a variety of plants.
Preparing Your Containers
The first step in winter sowing is preparing your containers. You can use a variety of containers, such as plastic jugs, milk cartons, or even yogurt containers. The key is to ensure they have drainage holes to prevent waterlogged soil. Clean and dry the containers thoroughly before use.
Adding Drainage and Ventilation
Proper drainage and ventilation are crucial for healthy seed growth. Add drainage holes to the bottom of your containers to prevent water from accumulating. You can also add a layer of small rocks or broken pottery to improve drainage. For ventilation, consider cutting a few slits in the sides of your containers to allow for air exchange.
Soil Preparation and Seed Planting
Next, prepare your soil mix. A good mix should be well-draining and rich in organic matter. You can purchase a seed starting mix or make your own by combining peat moss, vermiculite, and perlite. Fill your containers with the soil mix, leaving about an inch at the top for watering. Plant your seeds at the correct depth according to the seed package instructions.
Proper Labeling Techniques
Labeling your containers is essential for keeping track of what’s growing. Use a permanent marker to label each container with the date, seed type, and any other relevant information. You can also use labels or stickers, but ensure they are weather-resistant.
By following these simple steps, you’ll be well on your way to successful winter sowing. Remember to place your containers in a safe location outdoors, protected from extreme weather conditions, and wait for the magic to happen.
Best Plants for Winter Sowing: What Thrives Outdoors
Choosing the right plants is crucial for successful winter sowing. Certain plants are more suited to this method than others, and understanding which ones thrive outdoors during the winter months can significantly improve your gardening success.
Cold-Hardy Vegetables
Cold-hardy vegetables are ideal for winter sowing. Vegetables like spinach, kale, and radishes can withstand frost and continue to grow as soon as the weather begins to warm up. Spinach, for instance, can be harvested in as little as 20 days after sowing, making it a great choice for early spring produce.
Other cold-hardy vegetables such as lettuce, peas, and carrots can also be started through winter sowing. These plants are hardy and can tolerate the cold temperatures, giving you a head start on the growing season.
Native Perennials and Wildflowers
Native perennials and wildflowers are another excellent choice for winter sowing. Plants like coneflowers, black-eyed Susans, and cosmos can be directly sown into the ground during the winter. These plants often require a period of cold stratification to germinate, making winter sowing a natural and effective method.
By sowing native perennials and wildflowers in the winter, you can enjoy a vibrant display of flowers in the spring and summer without the need for elaborate indoor starting setups.
Herbs That Excel in Winter Sowing
Certain herbs excel when started through winter sowing. Herbs like cilantro, dill, and parsley can be directly sown into containers or directly into the ground. These herbs germinate quickly and can be harvested before the heat of summer, making winter sowing an ideal method for getting a jump on the herb growing season.
Plants to Avoid Winter Sowing
While many plants thrive when started through winter sowing, there are some that are better started indoors or in the spring. Plants like tomatoes, peppers, and eggplants are typically too sensitive to cold to be started through winter sowing and are better started indoors 4-6 weeks before the last frost date.
“The key to successful winter sowing is understanding the specific needs of the plants you’re working with.” – Gardening Expert
By focusing on the right plants for winter sowing, you can make the most of this simple and effective gardening technique. Whether you’re growing cold-hardy vegetables, native perennials, or herbs, winter sowing can give you a head start on the growing season.
DIY Winter Sowing Containers: Upcycled Options
One of the joys of winter sowing is the opportunity to get creative with DIY containers. Instead of purchasing specialized gardening containers, you can repurpose common household items to create effective and eco-friendly mini-greenhouses for your seeds.
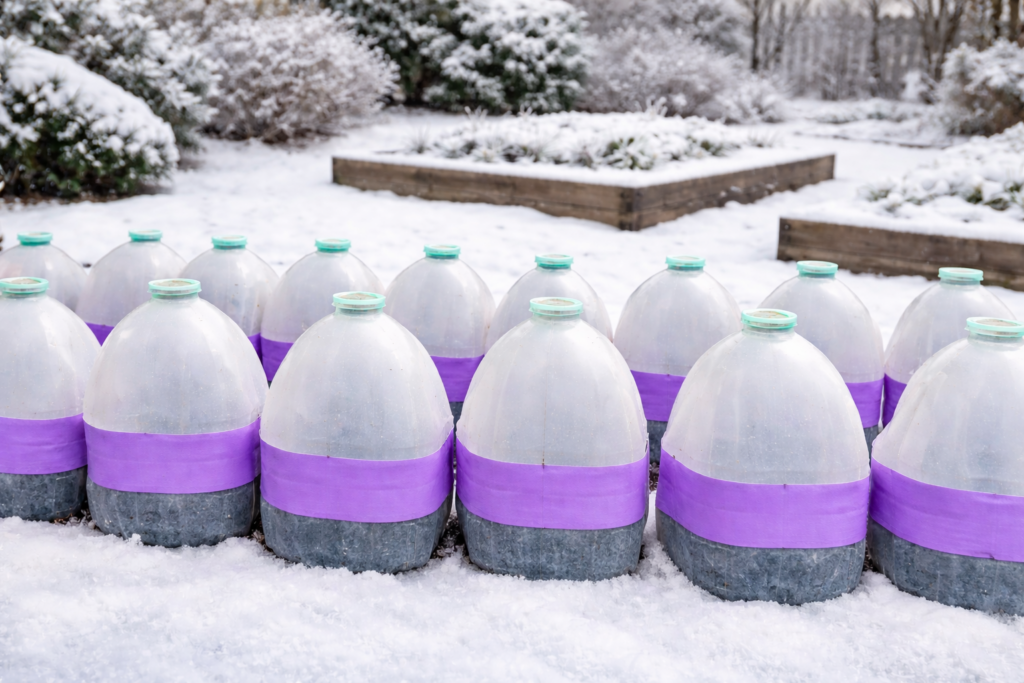
Milk Jug Greenhouses
Milk jugs are a popular choice for winter sowing containers due to their availability and ease of use. Simply cut the jug in half, fill the bottom half with soil, plant your seeds, and then place the top half back on as a mini-greenhouse. Don’t forget to poke a few drainage holes in the bottom to prevent waterlogged soil.
Plastic Food Containers
Plastic containers from takeout or yogurt are another great option. They are typically clear, which allows for sunlight to reach your seedlings, and they often have lids that can be used to maintain humidity. Just be sure to clean them thoroughly before use to prevent any potential contamination.
Other Creative Container Ideas
Beyond milk jugs and plastic food containers, you can get creative with other household items. Consider using old tin cans, cardboard tubes, or even wooden crates to create unique and functional containers. The key is to ensure they have drainage and can be covered to retain moisture and warmth.
By choosing to DIY your winter sowing containers, you’re not only saving money but also reducing waste. It’s a win-win for your garden and the environment.
Winter Sowing Maintenance: What to Do After Planting
Post-planting care is critical in winter sowing, requiring attention to moisture, temperature, and cover management. Ensuring the right conditions during this period is vital for the successful germination and growth of your seeds.
Monitoring Moisture Levels
One of the key factors in winter sowing maintenance is monitoring the moisture levels within your containers. It’s essential to check the soil periodically to ensure it’s not too dry or too wet. Proper moisture encourages germination and root development. If you find the soil is too dry, you can lightly water it. However, be cautious not to overwater, as this can lead to rot and poor germination.
Temperature Management
Temperature plays a significant role in the germination process. Most seeds require a certain temperature range to germinate. For winter sowing, it’s often beneficial to let nature take its course, as many seeds are adapted to cold temperatures. However, it’s a good idea to monitor the temperature fluctuations and ensure that your containers are not exposed to extreme conditions that could damage the seeds or seedlings.
| Temperature Range | Effect on Seeds |
|---|---|
| 32°F – 40°F | Ideal for cold stratification of many seeds |
| 40°F – 50°F | Encourages germination for many species |
| Above 50°F | May require shading to prevent overheating |
When to Remove Covers
As the weather warms up and seedlings begin to grow, it’s crucial to know when to remove the covers from your winter sowing containers. Generally, you should remove the covers when the threat of frost has passed and the seedlings are strong enough to withstand outdoor conditions. This transition should be done gradually to harden off the seedlings, preventing shock from sudden exposure to full sun or wind.
By following these maintenance tips, you can ensure a successful winter sowing experience, giving your seeds the best chance to germinate and grow into healthy plants.
Troubleshooting Common Winter Sowing Problems
Even with careful planning, winter sowing can present some unexpected challenges. As you venture into this method of gardening, being prepared for potential issues can make a significant difference in your success.
Dealing with Mold and Fungus
Mold and fungus can be a problem in winter sowing due to the moist, enclosed environment. To combat this, ensure your containers have adequate ventilation and drainage. If you notice mold or fungus, remove the cover for a few days to dry out the soil slightly. You can also try to improve air circulation around the containers.
No Germination Issues
If your seeds fail to germinate, check that they were not too old or improperly stored. Ensure the soil was kept at the right moisture level and that the temperature was suitable for the specific seed type. Some seeds may require a longer stratification period or specific conditions to germinate.
Pest Prevention
Pests can be a nuisance even in winter. To minimize the risk, keep your containers clean and free of debris. If you notice pests, consider using organic pest control methods such as neem oil or diatomaceous earth.
Weather Extremes Protection
Winter sowing containers can be vulnerable to extreme weather conditions. To protect them, you can use row covers or bring the containers to a more sheltered location during harsh weather. Ensure the containers are securely positioned to withstand wind and snow.
| Issue | Cause | Solution |
|---|---|---|
| Mold/Fungus | Poor ventilation, excessive moisture | Improve ventilation, reduce watering |
| No Germination | Old seeds, improper storage, wrong temperature | Check seed viability, adjust storage and temperature |
| Pests | Debris, unclean containers | Clean containers, use organic pest control |
| Weather Extremes | Exposure to harsh weather | Use row covers, move to sheltered location |
From Winter Containers to Garden: Transplanting Tips
Once your winter-sown seedlings have grown strong enough, it’s time to make the transition to your garden. This step is crucial for their continued growth and success.
When to Transplant Winter-Sown Seedlings
The timing of transplanting is critical. Wait until the danger of frost has passed and the soil has warmed up. For most regions, this is when daytime temperatures consistently reach above 60°F (15°C), and nighttime temperatures are above 40°F (4°C).
Check the weather forecast before transplanting to ensure a spell of mild weather. Avoid transplanting during extreme weather conditions.
Hardening Off Process
Before moving your seedlings to the garden, they need to be hardened off. This process involves gradually exposing them to outdoor conditions over 7-10 days. Start by placing them in a shaded area, gradually increasing their exposure to sunlight and wind.
Monitor your seedlings closely during this period. If you notice any signs of stress, such as wilting or discoloration, adjust their exposure accordingly.
Transplanting Techniques for Success
When transplanting, handle the seedlings carefully to avoid damaging their roots. Dig a hole that is twice as wide and just as deep as the container. Gently remove the seedling from its container, taking care not to disturb the roots.
Place the seedling in the hole, firm the soil gently around it, and water thoroughly. Space your seedlings appropriately to allow for air circulation and growth.
By following these transplanting tips, you’ll be able to successfully move your winter-sown seedlings to the garden, giving them the best chance to thrive.
Advanced Winter Sowing Techniques for Your Second Season
As a seasoned winter sower, you’re probably looking for ways to expand your repertoire and tackle more challenging plants. This section will guide you through advanced techniques to enhance your winter sowing experience, focusing on succession sowing strategies and experimenting with challenging seeds.
Succession Sowing Strategies
Succession sowing is a powerful technique that ensures a continuous harvest throughout the growing season. By staggering your plantings, you can enjoy a steady supply of fresh produce. Here are some key strategies to implement:
- Staggered Planting: Plant seeds at different intervals to extend the harvest period.
- Crop Selection: Choose varieties that mature at different rates to keep your harvest diverse.
- Season Extension: Use cold frames or row covers to protect your crops and extend the growing season.
Experimenting with Challenging Seeds
Some plants can be more finicky or challenging to grow from seed. Winter sowing provides an excellent opportunity to experiment with these varieties. Consider trying your hand at:
- Native Perennials: Many native perennials can be tricky to germinate but thrive when winter sown.
- Herbs: Certain herbs, like lavender or rosemary, can be challenging to start indoors but do well with winter sowing.
- Wildflowers: Winter sowing is ideal for many wildflower species that require cold stratification.
By incorporating these advanced techniques into your winter sowing routine, you’ll not only expand your plant palette but also enhance your overall gardening success. Whether you’re looking to improve your winter sowing diy skills or seeking tips for winter sowing for beginners, these strategies will help you achieve a more bountiful and diverse garden.
Conclusion: Embracing the Winter Sowing Journey
As we’ve explored throughout this beginner’s guide to winter sowing, this technique offers a unique and rewarding approach to gardening. By understanding the science behind winter sowing and implementing the steps outlined, you can successfully grow a variety of plants, from cold-hardy vegetables to native perennials and wildflowers.
Winter sowing for beginners is an accessible and cost-effective method that allows you to get a head start on the growing season. With the right supplies, including containers, soil, and seeds, you can create a thriving mini-garden that will flourish as the weather warms up.
As you continue on your winter sowing journey, remember to monitor moisture levels, manage temperature fluctuations, and transplant seedlings at the right time. By following these tips and troubleshooting common issues, you’ll be well on your way to enjoying a bountiful harvest or a vibrant display of flowers.
With each success, you’ll become more confident in your gardening abilities, and winter sowing will become a valuable tool in your gardening toolkit. So, embrace the journey, and happy gardening!
FAQ
What is winter sowing, and is it suitable for beginners?
Winter sowing is a gardening technique that involves sowing seeds in containers outdoors during the winter months. It’s perfect for beginners because it’s a low-maintenance and straightforward method that allows seeds to germinate and grow naturally.
What are the best plants for winter sowing?
Cold-hardy vegetables, native perennials, wildflowers, and certain herbs are ideal for winter sowing. Some examples include kale, spinach, coneflower, and chamomile. Avoid plants that are sensitive to frost or require warm temperatures to germinate.
How do I prepare containers for winter sowing?
To prepare containers, choose ones with drainage holes, add a layer of soil, and sow seeds at the correct depth. Label the containers and ensure they have ventilation to prevent moisture buildup.
What kind of containers can I use for winter sowing?
You can use a variety of containers, such as milk jugs, plastic food containers, or other upcycled materials. The key is to ensure they have drainage holes and can withstand outdoor weather conditions.
How do I care for my winter-sown seedlings?
Monitor moisture levels, manage temperature fluctuations, and remove covers when the weather warms up. Keep an eye out for pests and diseases, and take action promptly if you notice any issues.
When is the best time to transplant winter-sown seedlings?
Transplant seedlings when they are strong enough and the weather is suitable. Harden off the seedlings before transplanting them into larger containers or directly into the garden.
Can I use winter sowing for succession sowing strategies?
Yes, winter sowing can be used for succession sowing. By sowing seeds at different times, you can achieve a continuous harvest and extend the growing season.
What are some common problems with winter sowing, and how can I troubleshoot them?
Common issues include mold, poor germination, pests, and weather extremes. To troubleshoot, ensure good ventilation, maintain optimal moisture levels, and protect containers from extreme weather conditions.